Bottom line we are back on schedule. I should be able to get the wood assembled within a couple of weeks. Then a couple more weeks to work with Rob to attached them to the stems. So the July 20th installation date is still plausible if not sooner.
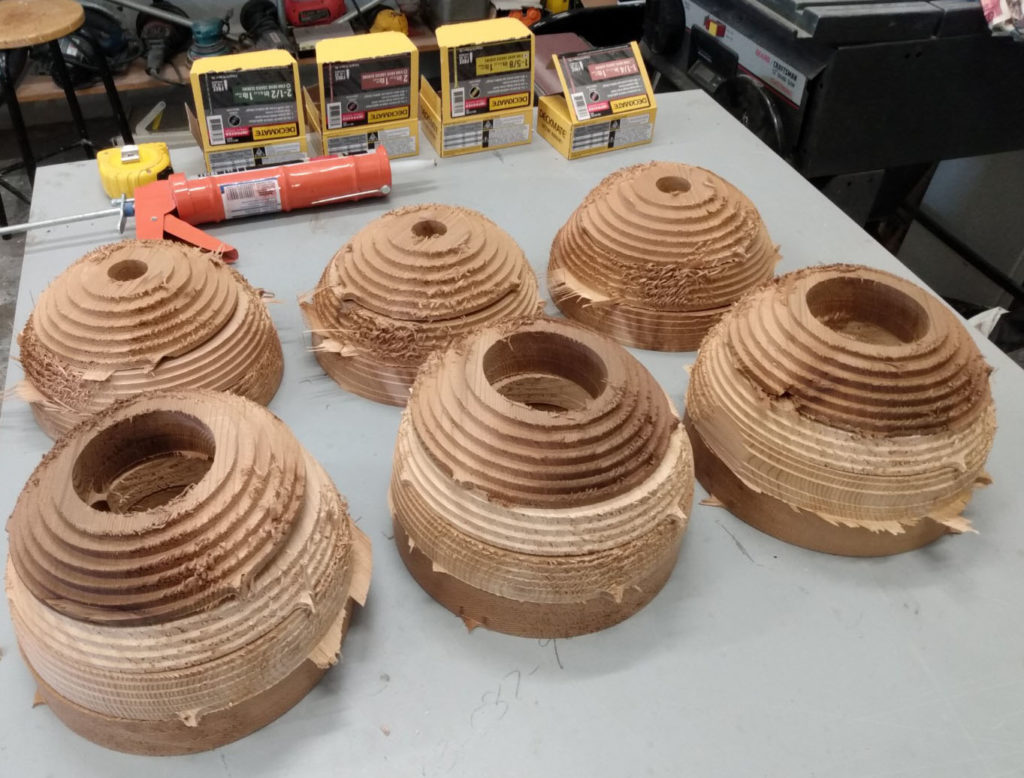
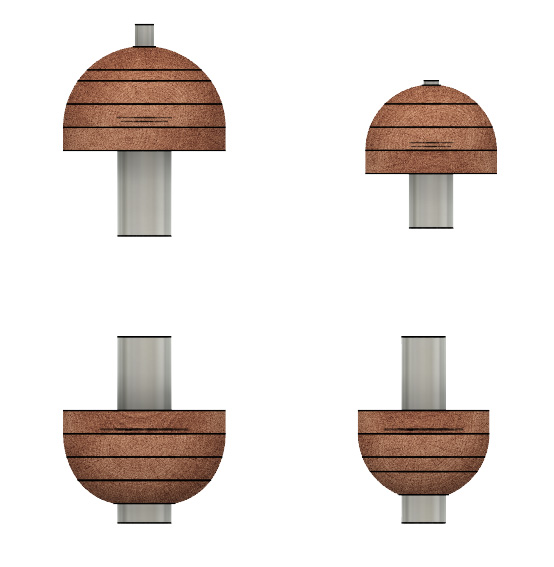
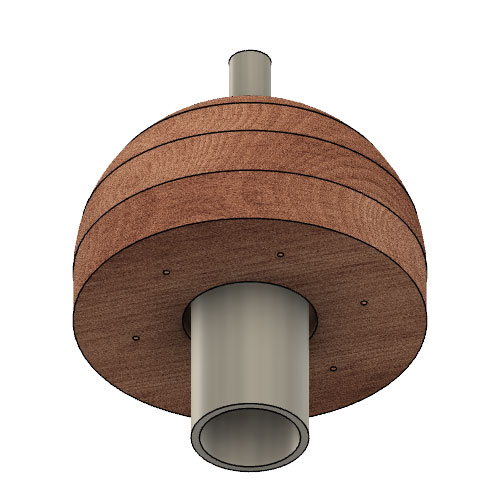
After a little trial and error I was able to put the puzzle together. We have all the rounded tops and bottoms ready to assemble. See right column.
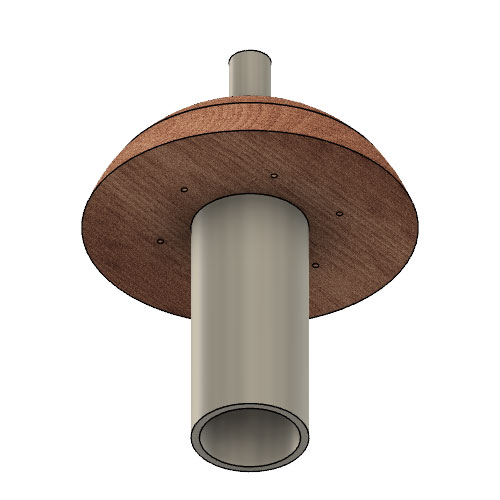
Below is a sample of the waterproof silicone glue positions and 6 screw positions. I glued and screwed one of the large bottom assemblies.
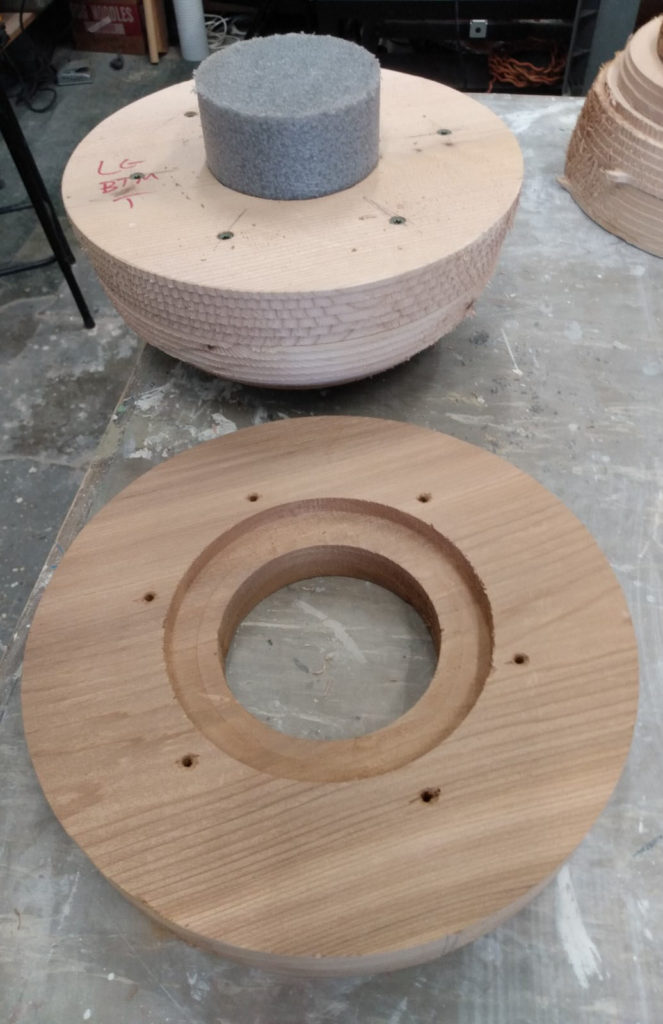
However, when I was home and looking at the picture to the right, I realized there was a serious mistake.
Because there are extensions to the large bottom stems, there is no way to slide the bottom round assembly onto the stem from the bottom. This is not the case for the small cattails, because there is no extension.
I had to run back to the studio and unscrew the assembly and hoped the glue wasn’t dry yet. It wasn’t and the separated fairly easily.
The solution is to slit the bottom round assembly into two have so that they create a tung and grove. This way the two halves can be put together when we but them on the galvanized stems.
Fabricating & Attaching the Cedar Seedpods
After some consultation with Hadi we have come to a decision on the best way to create the seedpods and attach them to the galvanized steel pipes.
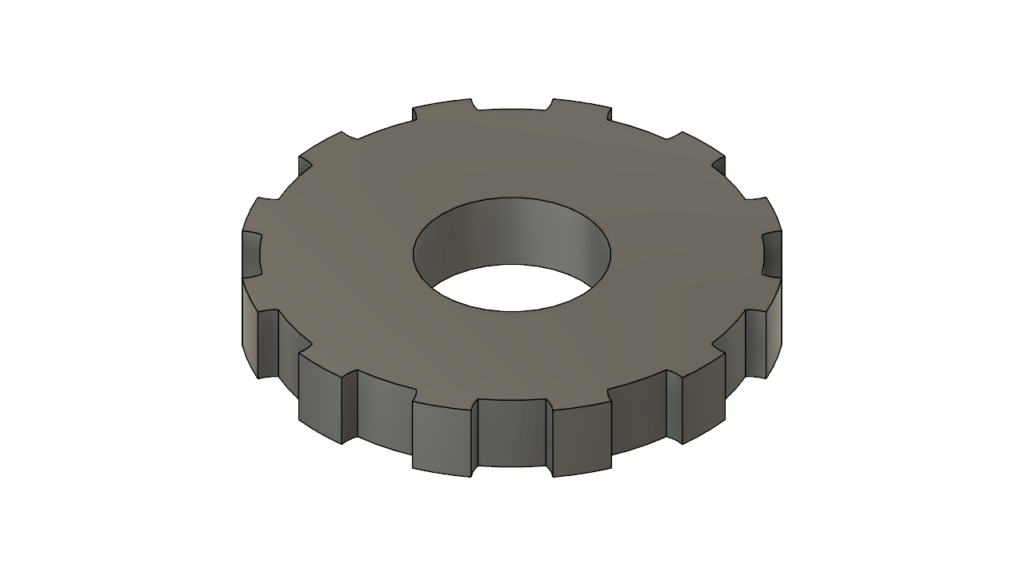
The disks will be cut (CNC) from rough sawn cedar, which varies slightly in width either side of 1 – 3/4″.
They will be cut to a size that will accommodate the CNC machine.
They will be planed slightly to take out any cupping.
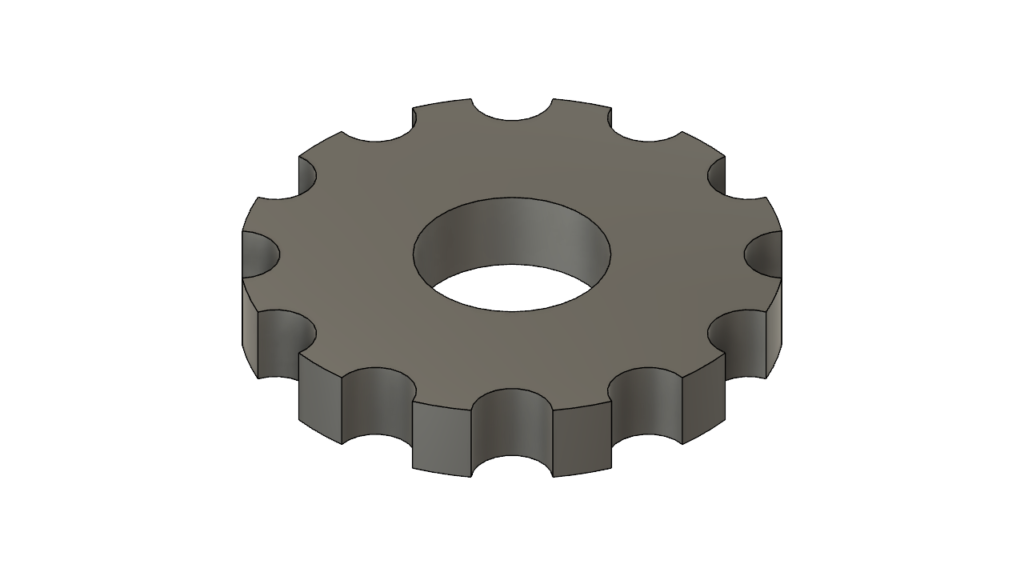
We will be cutting the disks round with no attempt at texture.
The first and last four slices will be screwed together with 2 rings of silicone glue. See sketch in right column.
The rest of the rings will be attach with one ring of silicone (close to the center hole) and held together during gluing with a 3-rope tourniquet or clamps.
Exactly where and when these processes take place is still TBD. Justin, Rob and I need to think through these processes. Here is one possible scenario:
In Justin’s Studio
Planning and CNC cutting.
In Remo’s Studio
Gluing & clamping the middle full disks.
Putting in the end disk pilot holes.
Gluing & Screwing the end disks.
At this point each seedpod will have four pieces.
Bottom Assembly: The bottom 3 slices, which goes below the retainer ring.
Single Disk: The next single disk with 4 pilot holes, which goes above the steel retainer ring.
Main Assembly: All the rest of the full rings, which makes up most of the seedpod.
Top Assembly: The top 3 slices.
In Rob’s Studio
Slide the Bottom Assembly onto the stem from the bottom.
Slide the Single Disk onto the stem from the top; glue with 2 rings of silicone; and insert 4 screws.
Slide the Main Assembly onto to stem and glue with 1 ring of silicone.
Slide the Top Assembly onto the the stem and glue with one ring of silicone.
Apply a rope tourniquet to the entire seedpod until glue is set.
Attach tourniquet if needed.
This is just my take on how this might go.
Note: the space for the 1/4″ retainer ring will be cut into the Bottom Assembly not the Single Disk.
Notes to Rob The retainer ring locations are still not determined precisely yet. I want to wait until we have talk this through.
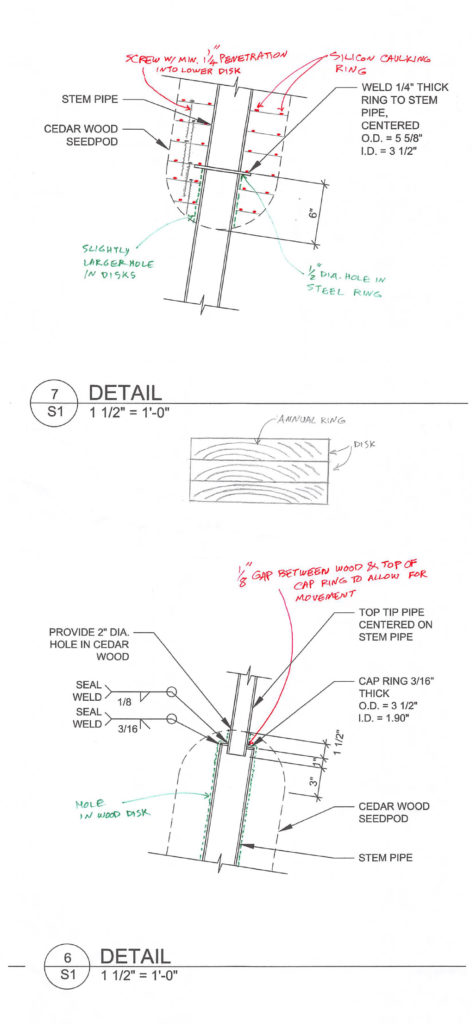
Engineering Plans focusing on Seedpod Attachement
This Hadi plan is accurate with one changes: The Main Assembly (all the disks minus the ends) will not need screws and they will just get one ring of silicone glue near the inner stem pipe.
CAD STL Files
The next thing to do is to create the CAD STL files to be used by the CNC machine. After consulting with Hadi and Rob we have decided to use a 3 7/8″ hole in the large 10.5″ seedpod. Using the same logic on the small Seedpods, we will add 3/8″ to the 2 7/8″ OD diameter, establishing a center hole of 3 1/4″.
To do this I will need to know a few things with more accuracy. Let’s start with the large cattails:
Large Cattails Hole Diameter Pod diameter is 10.5″ Hole diameter is 4″
Small Cattails Hole Diameter Pod diameter is 8.5″ Hole diameter is 3 1/4″
Large Cattails Tip Hole Diameter: 1.5″ Tip Pipe Diameter: 1.25″ Space between pipe and wood is 1/8″ on each side.
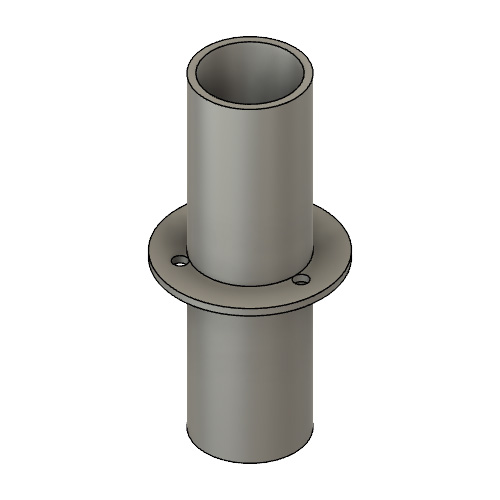
Ring Diameter: 5″ Quarter-inch Indent Diameter: 5 1/16″ Indent: 5/16″
Small Cattails Tip Hole Diameter: 1.25″ Tip Pipe Diameter: 1″ Space between pipe and wood is 1/8″ on each side.
Large Cattails Wood Thickness: 1.5 Wood Outside Diameter: 10.5″ Stem Hole Diameter: 4″ Stem Pipe Diameter: 3.5″ Space between pipe and wood is 1/4″ on each side.
Small Cattails Wood Thickness: 1.5″ Wood Outside Diameter: 8.5″ Stem Hole Diameter: 3.25″ Stem Pipe Diameter: 2 7/8″ Space between pipe and wood is 3/16″ on each side.
xxx
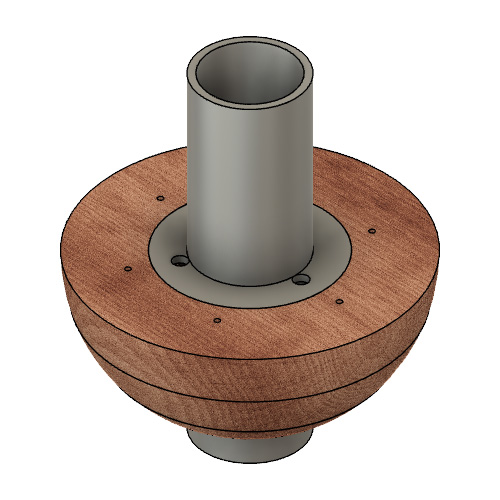
Note: The image above shows the ring indenteded in the first curved wood diske. We changed this to create the indent in the first full disk.
This is a useful video testing different construction adhesives.
Vcarving Top & Bottom Rings
This video is the best I’ve found explaining importing STLs and #D Cutting.
To Import a STL File In the V-carve menu, go to File > Import > Import Component – 3D Model… then locate and import the file.
You will be taken to the Modeling tab > Import 3D Model > Transform tool, where you can:
Select the Initial Orientation so that the model lays flat on the bed.
Resize the model (if needed).
Center the Model.
With the model selected choose the Create vector boundary around selected components.
Tool path the contour first by using the 3D Roughing Toolpath tool. Or go directly to the 3D Smoothing Toolpath tool if you think it is safe. Save the toolpath.
Then create the inside toolpath then the outside toolpath.
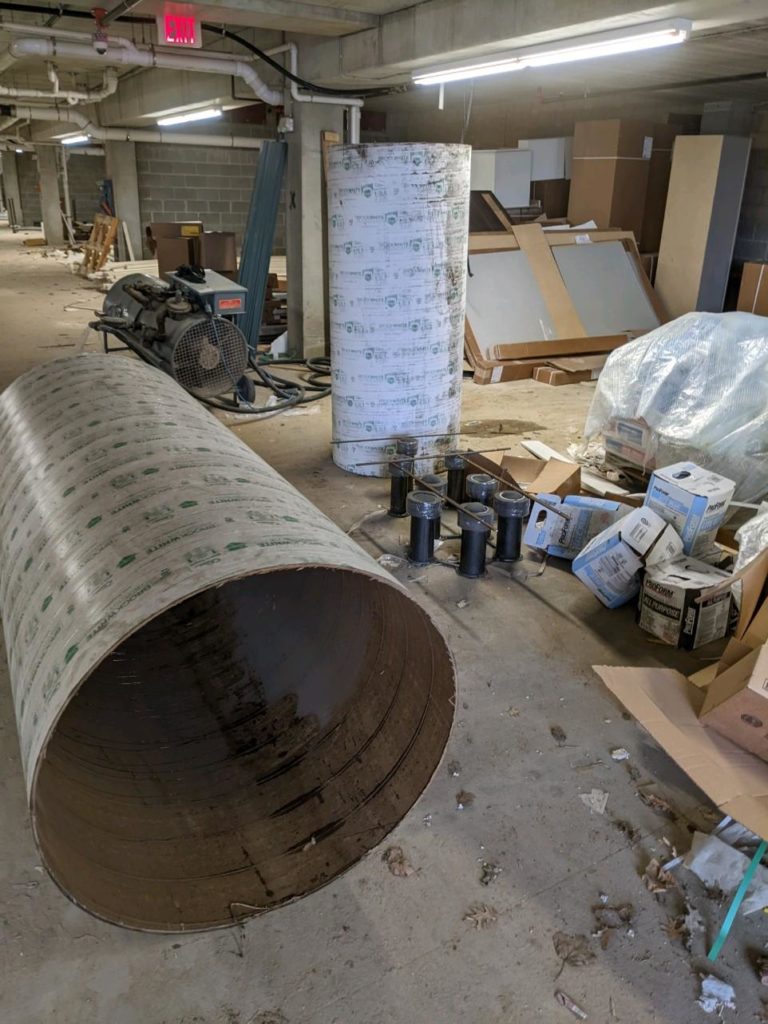
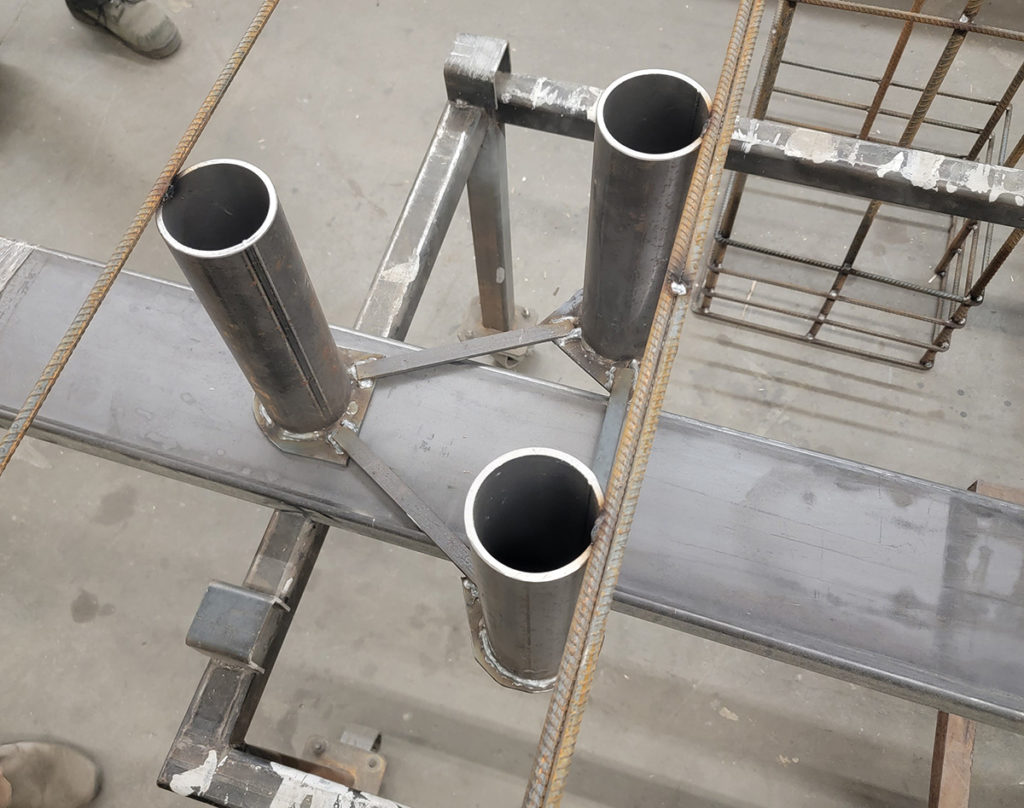
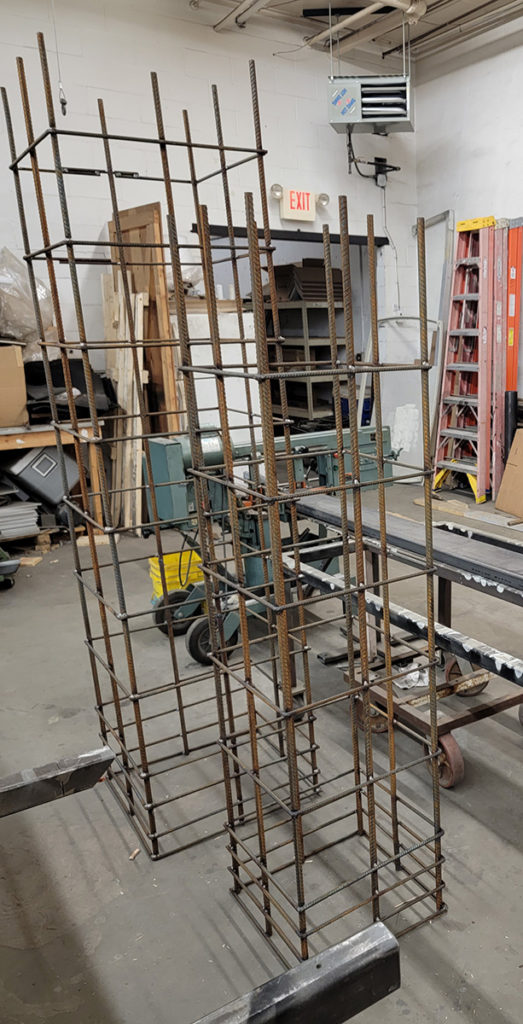
On April 20th the foundation sonotubes, rebar cage and retainer assemblies were delivered to the site. The sonotubes were put inside.
Photo by: Rob Stafford
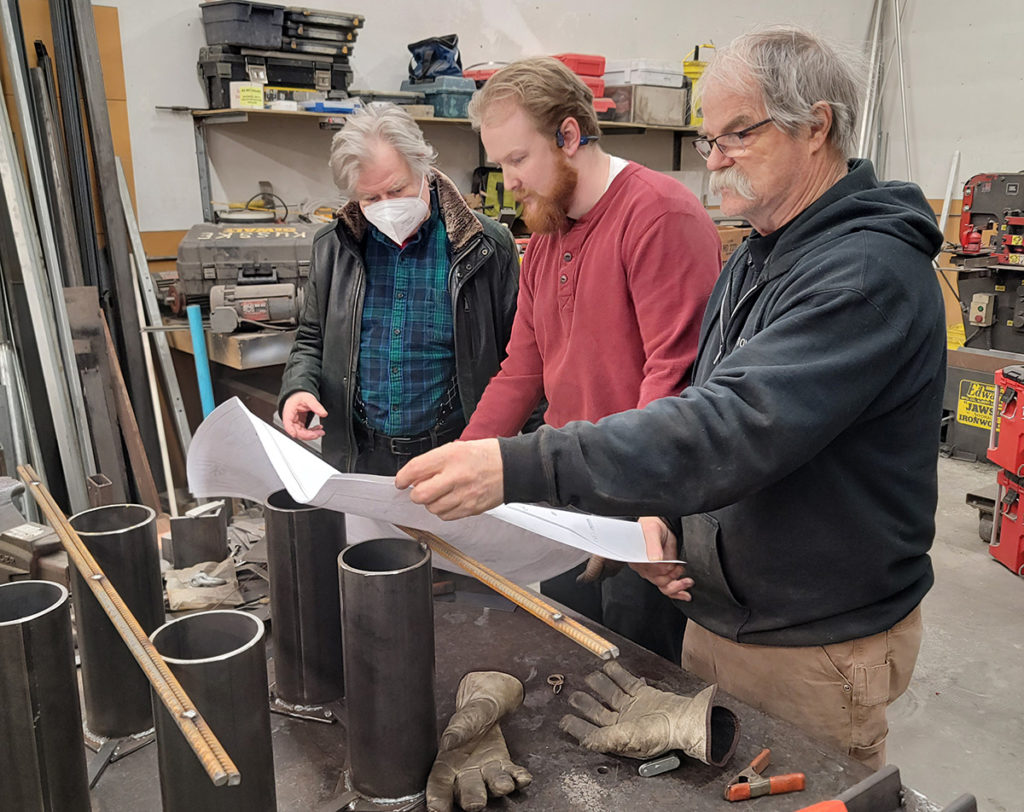
Remo Campopiano, Burt Stafford and Rob Stafford disussing next steps. Photos by: Lisa Roy
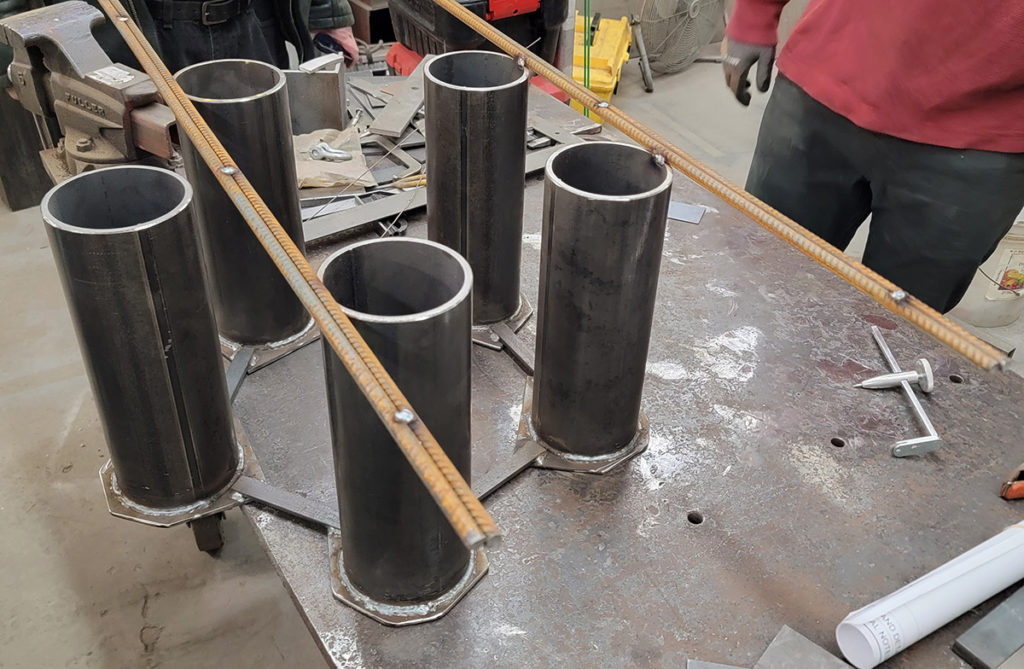
Inspecting the foundation assemblies and cages. They were expertly fabricated.
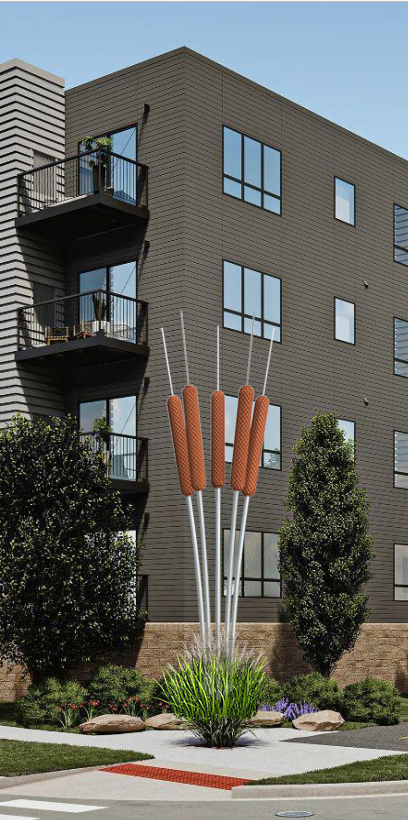
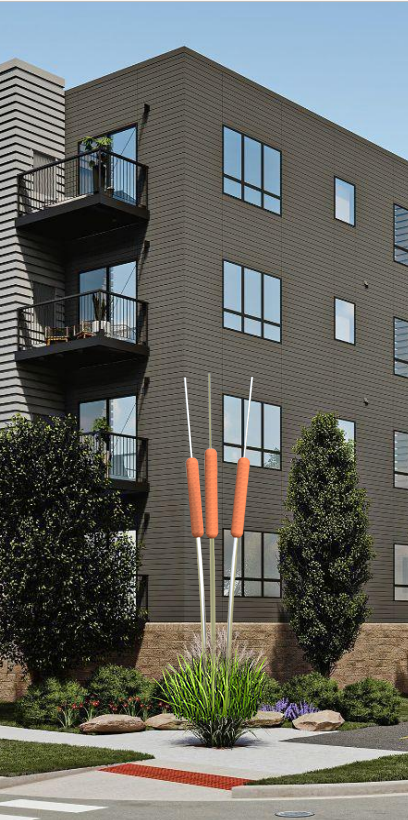
Renders by: Remo Campopiano
This render of 5 cattails uses the following dimensions as of 3/26/22.
The sculpture is just under 24′ tall from the ground plane.
The stems diameter is 3.5″ OD. (3″ pipe SCH80)
The seedpods diameter is 10″ in diameter. [We decided to change it to 10.5″]
The seedpod lengths should vary on either side of 5 feet.
The tips diameter is 1.9″ OD in diameter. (1.5″ pipe SCH40)
The tips length is 4′.
This render uses the following dimensions as of 4/10/22.
The sculpture is just under 18′ tall from the ground plane.
The stems diameter is 2 7/8″ OD. (2.5″ Pipe SCH40)
The seedpods diameter is 7.5″ in diameter. [We decided to change it to 8.5″]
The seedpod lengths should vary: left 4′, center 4.5′, right 4′
The tips diameter is 1.25″ OD in diameter. (1″ pipe SCH40)
The tips length is 4′.
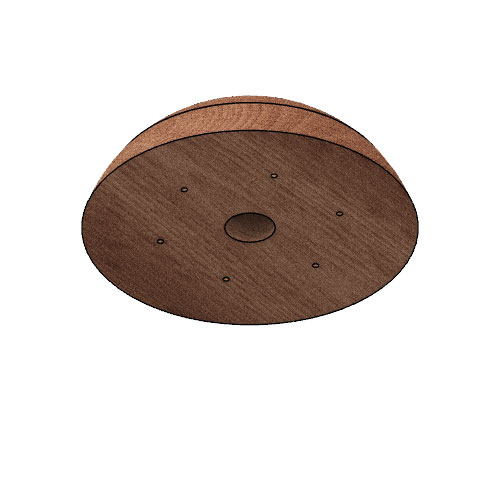
The image below shows the seedpod diameter 10". We have decided to change it to 10.5 inches.
Creating the Seedpods
The cedar lumber from Menards has actual dimensions 1.75″ x 11.75″ and the come in 8′ and 12′ lengths.
Seedpods for 5 Cattails
We will need 2x12s to get a full 10.5″ diameter.
With 1.75″ boards, we need 35 disks for to make one 5′ seedpod, or 175 disks to make five seedpods.
We get 8 disks from a 8′ board. (more waste) We get 13 disks from a 12′ board. (optimal)
15 – 1.75″ x 11.75″ x 12′ cedar boards makes 195 disks…20 more than we need so we can pick the best ones.
At $149 per board 15 boards = $2235
———————
Seedpods for 3 Cattails
We will need 2x10s to get a full 8.5″ diameter disk.
With 1.75″ boards, we need 28 disks for to make one 4′ seedpod, or 84 disks to make three seedpods.
We get 10 disks from a 8′ board. (more waste) We get 16 disks from a 12′ board. (optimal)
6 – 1.75″ x 11.75″ x 12′ cedar boards makes 96 disks…12 more than we need so we can pick the best ones.
At $113 per board 6 boards = $678
Total Cedar: $2235 + $678 = $2913
At Menards – Red Cedar Lumber – Rough Sawn
$149 – Actual size: 1-3/4 x 11-3/4 x 12′
$99 – Actual size: 1-3/4 x 11-3/4 x 8′ $113 – Actual size: 1-3/4 x 9-3/4 x 12′ $75 – Actual size: 1-3/4 x 9-3/4 x 8′
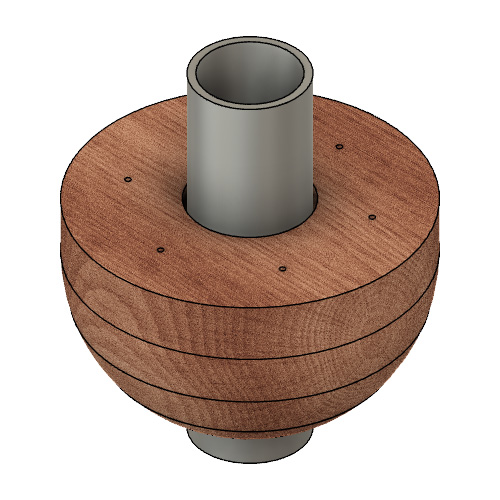
The image below shows the seedpod diameter 7.5". We have decided to change it to 8.5 inches.
Siwek Prices:
5-Cats It takes 175 disks to make 5 – 5′ long cattails.
We get 13 disks from a 12′ board. 175 disks / 13 = 13.5, 12′ boards. Add one more for waste and we need 15, 12′ boards.
15 – 12′ boards @ $156 = $2340
3-Cats It takes 84 disks to make 3 – 4′ long cattails.
We get 16 disks from a 12′ 2×10 board. 84 disks / 16 = 5.25, 12′ boards. We need 6, 12′ boards.
6- 12′ boards @ $114 = $684
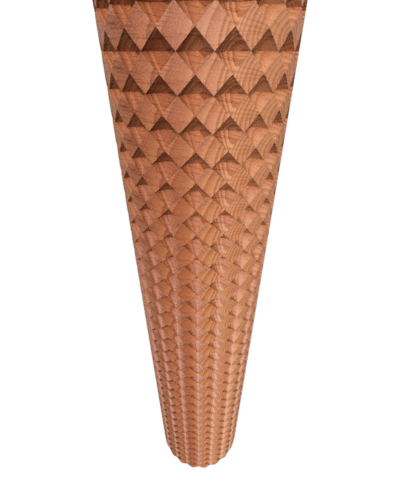
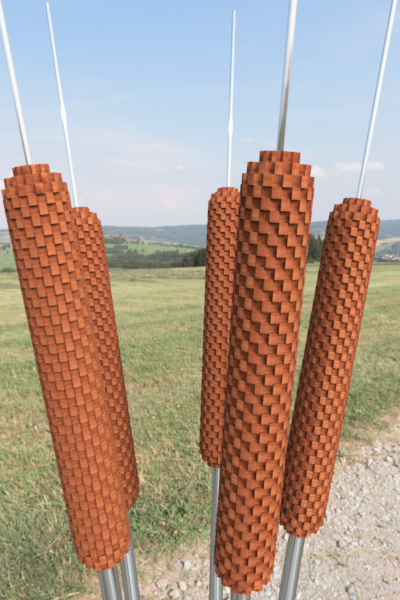
Here is one way to make the cattail texture. It uses a 90 degree V router bit. But it require flipping them over to do the other side. 1.5″ cedar stock.
Below is a simpler way. It just take a side-cutting router bit that can cut 1.5″ cedar stock.
The five cattails above uses the simple cutting method. It looks rather course up close but from a distance you can hardly see it. See large image below. I do like the simple pattern.
To refine this method we would have to use 3/4″ boards. I’m not sure if it is worth it.
We could make the indents shallower like the second disk drawing, but I’m not sure if it will change the coarseness, but it might be stronger.
I’m wondering if taking a grinder to the surface using a wire wheel might soften it. It would take the tips off the 1.5″ squares and round them a bit.
This render above uses the simple texture method. The stems are 3.5″ in diameter. the seedpods are 5′ 4.5″ long and 10″ in diameter. The tips are 4′ tall and 1.9″ in diameter. I’ve change my mind about reducing the tip diameter.
I am investigating tapered tips…they do sell them.